Hi
How does the switch work ? as only 5 of the lugs seem to be used.
I assumed the top and bottom lugs were joined as the switch goes to each position
BITMO 2BO Mod Kit-Behringer VT911 VintageTube Overdrive

Information
- Posts: 33
- Joined: 16 Nov 2008, 16:46
- Completed builds: ROG Big Daddy
ROG Grace
ROG Little Gem
ROG Tantalus Project
ROG 3 Legged Dog
DOD 250
MXR Dist +
Easy Face
Fuzz face
Orange Squeezer
That's the way I'm reading it as well. As it's written, the .0047 mf cap doesn't seem to do anything since the other lug of the switch it's connected to is left open. This cap never makes it into the signal path of the effect?
Any help is appreciated. I have a tube monster en route, and I'd like to try this mod out.
Any help is appreciated. I have a tube monster en route, and I'd like to try this mod out.
Cheers,
Dave
Dave
Information
- Posts: 33
- Joined: 16 Nov 2008, 16:46
- Completed builds: ROG Big Daddy
ROG Grace
ROG Little Gem
ROG Tantalus Project
ROG 3 Legged Dog
DOD 250
MXR Dist +
Easy Face
Fuzz face
Orange Squeezer
FWIW, here's how I understand the instructions for the mod:
If the switch is a 2P3T, as the website suggests (3 different voicings from the switch) then each switch position connects the parallel lugs, ie. position 1 = top two lugs, position 2 = middle two lugs, position 3 = bottom two lugs.
If I understand the mod instructions (I probably don't) and drew the mod correctly (I probably didn't) and if the switch is indeed a 2P3T On-On-On type (it probably isn't), then the .0047 uf cap doesn't really serve any purpose that I can see?
If I understand the mod instructions (I probably don't) and drew the mod correctly (I probably didn't) and if the switch is indeed a 2P3T On-On-On type (it probably isn't), then the .0047 uf cap doesn't really serve any purpose that I can see?
Cheers,
Dave
Dave
Information
- Posts: 33
- Joined: 16 Nov 2008, 16:46
- Completed builds: ROG Big Daddy
ROG Grace
ROG Little Gem
ROG Tantalus Project
ROG 3 Legged Dog
DOD 250
MXR Dist +
Easy Face
Fuzz face
Orange Squeezer
Ok, my assumptions about the switch were wrong. The switch is a dpdt center off type toggle, which makes much more sense.
Cheers,
Dave
Dave
Hi, I just did the mod and was incredible the changes in tone, specially lowering his harshness. Very recommended mod. I did thanks the information here in this post.
Long live rock and roll.
Long live rock and roll.
GuitarLord5000 wrote:Ok, my assumptions about the switch were wrong. The switch is a dpdt center off type toggle, which makes much more sense.
so, in that case there are only two possible modes to choose!
I really don't understand the mod. there aren't 3 modes. why are they talk about a 3-way switch?
people who mallready made this mod:
how many clicks make your switch?
u p or down?
or up centre and down?
and do you here changings in sound all 3 settings?
Information
- Posts: 33
- Joined: 16 Nov 2008, 16:46
- Completed builds: ROG Big Daddy
ROG Grace
ROG Little Gem
ROG Tantalus Project
ROG 3 Legged Dog
DOD 250
MXR Dist +
Easy Face
Fuzz face
Orange Squeezer
You would have three options. Center off is stock tone, and the two switch positions would offer two different tone voicings. I've got my switch, so I'll be doing this mod soon.
Cheers,
Dave
Dave
GuitarLord5000 wrote:You would have three options. Center off is stock tone, and the two switch positions would offer two different tone voicings. I've got my switch, so I'll be doing this mod soon.
ok, now I see. in the middle/centre position the whole switch doesn't do anything. there are no internal contacts, so you get the normal pedalsound.
Yes, we have tree positions but central and upper (depending of DPDT mount) for me sounds equal, I checked for any mistake just in case but it´s Ok according the schematic in this forum. Anyway I think the sound has been improved but I think mostly for the capacitor in the Gain pot.
my new Behringer VT999 (Vintage Tube Monster distortion pedal) only works with the stock tube that comes with the pedal. All tubes I put in (like SOPVTEK 12AX7) don't do anything and there is no sound or only ia littel if I turn everything at max.
but all people change the tube without any problems. I think the sound with the stock tube is also too bad. not what it supposed to do. it sounds ugly with a very wobbling soundtail...
I also did the Mod (double checked the simple wiring) but nothing changed.
is there any solution for this? or is my unit broken?
Well this is really frustrating! I know this is an old thread but I found it by looking for info about this mod.
The original poster starts a thread about the BITMO 2BO mod for the VT911 VTO. No details provided, just a whinge about being had to the tune of $20 plus postage for 2 resistors and 2 caps plus instructions on where to put them, but it works.
A couple of posts later there's a detailed list (of different parts) and photos of a mod, but it's a VT999 VTM, ie; similar pedal but not the same one and obviously different mods. After that the whole thread seems to be about the 999, or at least no one is saying which pedal they are referring to.
I bought one of these VT911 VTO pedals a few years back and was immediately displeased with the sound it produced. All noticeable variable control on the Drive Pot was between 0 and 1, which took it from "Off" to "Filthy Noise". Anything over 1 was just a continuation of "Even More Filthy Noise" so it's obvious the little tube is being overdriven too hard, too fast.
I did some Googling and immediately found it was common to the pedal as sold, and info about the Mod, so I contacted Behringer who were very helpful and interested. The Manager of Customer Relations asked me to post it to him and email him with links to the forums / discussions about the pedal and the Mod kit. They lab tested my unit, agreed with me about it's shortcomings and informed me that they intended to do nothing about it. Don't ask me why! How stupid can you get, eh?
Anyway, I was asked what I wanted to do in relation to the pedal. A return, refund or swap for a different pedal of similar value. I selected to swap it for a Digital Delay (DD400 since my DD100 was rooted), which they sent me as a replacement and they also surprised me and gave me the VT911 back as well. Ok so that's not bad, but the pedal is useless to me without the mod. It's been sitting, in it's box, in a cupboard for 3 years so it's still basically brand new other than my initial trial and the testing in the lab.
Can anybody shed any light on what the apparently very minor mods are for this unit? I've probably got the components sitting here. I just need to know where to put them and the values. I find it unusual that this mod is not commonly shared when it is really well known.
-
wildschwein

- Breadboard Brother
Hi,
I'm the "whinger" who started thread several years ago. Not sure why it got mixed up with the VT-999 pedal as the title is pretty clear, although BitMo do a mod for that one too. I have sent everyone the mod for the VT-911 who has PMed me and asked for it. Here's a copy and paste of what I sent to others:
"I'll tell you the values and where the components go here - if you want to post it later it's all yours.
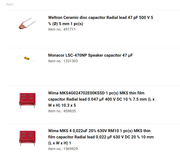
Parts list:
100k resistor (was supplied with a tan carbon comp)
460 OHM resistor (blue - metal comp )
1200pF capacitor (metalized polyester type)
.0047uf capacitor (not sure of this one - it was aqua-coloured and axial type - was marked with the number 472.)
You have to unscrew the tube board to do the job - but that's all. Looking at the tube board from the solder side there are the 9 pins - 1-9 going clockwise from the gap at the bottom of the board. The .0047uf cap goes between pin 1 and pin 7 of the the tube on the tube board. The 460 OHM resistor is connected to pin 7 and also the negative lead of the electrolytic capacitor (on the other side of the board). You should see the electrolytic cap's 2 solder connections just slightly above pins 6 and 7.
On the drive knob you just connect the 1200pF cap and the 100k resistor in parallel and solder them to the two outer pins of the pot - the instructions advise turning the knob all the way down before soldering.
Remount the tube board and that's it. You should notice when you plug it in that it has only a fraction of the gain it used to. I found the lower gain 12AU7 was no longer enough to get adequate output from the pedal so I dropped in a Sovtek 12AX7A - which was the highest gain tube I had laying around. The original Chinese tube seemed to not sound quite as good to my ears."
Hope this helps, I sold the pedal a while ago so no longer have it as a reference.
Regards,
Canaan (wildschwein).
I'm the "whinger" who started thread several years ago. Not sure why it got mixed up with the VT-999 pedal as the title is pretty clear, although BitMo do a mod for that one too. I have sent everyone the mod for the VT-911 who has PMed me and asked for it. Here's a copy and paste of what I sent to others:
"I'll tell you the values and where the components go here - if you want to post it later it's all yours.
Parts list:
100k resistor (was supplied with a tan carbon comp)
460 OHM resistor (blue - metal comp )
1200pF capacitor (metalized polyester type)
.0047uf capacitor (not sure of this one - it was aqua-coloured and axial type - was marked with the number 472.)
You have to unscrew the tube board to do the job - but that's all. Looking at the tube board from the solder side there are the 9 pins - 1-9 going clockwise from the gap at the bottom of the board. The .0047uf cap goes between pin 1 and pin 7 of the the tube on the tube board. The 460 OHM resistor is connected to pin 7 and also the negative lead of the electrolytic capacitor (on the other side of the board). You should see the electrolytic cap's 2 solder connections just slightly above pins 6 and 7.
On the drive knob you just connect the 1200pF cap and the 100k resistor in parallel and solder them to the two outer pins of the pot - the instructions advise turning the knob all the way down before soldering.
Remount the tube board and that's it. You should notice when you plug it in that it has only a fraction of the gain it used to. I found the lower gain 12AU7 was no longer enough to get adequate output from the pedal so I dropped in a Sovtek 12AX7A - which was the highest gain tube I had laying around. The original Chinese tube seemed to not sound quite as good to my ears."
Hope this helps, I sold the pedal a while ago so no longer have it as a reference.
Regards,
Canaan (wildschwein).
@ Wildschwein:- Please accept my apology for inferring that you were "whinging" about the price of the mod kit. This was not my intention. I read about the mod long ago and decided for myself that it was not worth the cost plus postage to mod this cheap pedal at the time so I fully understand where you were coming from. This is the reason I complained to Behringer back then about the design problem in their "out of box" unit. The mod kit plus postage was = 50% of the original purchase price.
I thank you for the details provided and will give it a try. From what I've read and what you've experienced, it seems that it turns "the worst sounding Tube Overdrive pedal on the market" (quote:- Bajaman), into something that is a usable piece of gear. I'll see for myself and report back.
I thank you for the details provided and will give it a try. From what I've read and what you've experienced, it seems that it turns "the worst sounding Tube Overdrive pedal on the market" (quote:- Bajaman), into something that is a usable piece of gear. I'll see for myself and report back.
-
wildschwein
- Breadboard Brother
Hey livo - No problems. Enjoy the mod. I still had the details in my messages so I thought I'd just let it get out there. Not sure why this thread became about the VT999!
Cheers,
wildschwein
Cheers,
wildschwein
GuitarLord5000 wrote:FWIW, here's how I understand the instructions for the mod:
If the switch is a 2P3T, as the website suggests (3 different voicings from the switch) then each switch position connects the parallel lugs, ie. position 1 = top two lugs, position 2 = middle two lugs, position 3 = bottom two lugs.
If I understand the mod instructions (I probably don't) and drew the mod correctly (I probably didn't) and if the switch is indeed a 2P3T On-On-On type (it probably isn't), then the .0047 uf cap doesn't really serve any purpose that I can see?
I request help my son's behringer vt911 pedal damaged this integrated but its reference number does not appear to change it, if anyone knows the reference number of this integrated highlighted in the photograph I would greatly appreciate it
- Attachments
-